Build Your Dream Pallet Shed: A Free & Functional Garden Tool Haven
Tired of tangled garden tools and a cluttered backyard? Transform discarded pallets into a stylish and functional shed for all your gardening essentials! This guide provides a step-by-step plan to build your own free pallet shed, saving you money and adding a unique touch to your garden. We'll cover everything from sourcing pallets to the final touches, empowering you to create a space you'll be proud of.
Sourcing Your Pallets: The Foundation of Your Free Shed
The first step in building your free pallet shed is, unsurprisingly, finding free pallets! Check with local businesses like grocery stores, hardware stores, and construction sites. Many businesses are happy to get rid of used pallets, making them a readily available resource. Inspect the pallets carefully before hauling them home. Ensure they are sturdy, free of rot, and relatively clean. You'll need a sufficient number to construct the walls and roof â€" the exact quantity depends on the size of your planned shed. Plan your shed dimensions before gathering pallets to avoid needless trips or excess material.
Preparing the Pallets: Cleaning and Repair
Once you have your pallets, thoroughly clean them. Use a stiff brush to remove dirt, debris, and any loose nails. Inspect each pallet for damaged wood or loose slats. Replace or reinforce any weak areas. This initial work ensures the longevity and structural integrity of your shed. Consider using wood glue and screws to reinforce weak joints. For a truly polished look, sand down any rough edges after cleaning to make the finished product safer and more aesthetically pleasing.
Dealing with Nails and Hardware
Exercise caution when handling pallets. Many contain old, rusty nails that can be dangerous. Wear gloves and safety glasses during cleaning and assembly. If you find protruding nails, hammer them flush or carefully remove them using a claw hammer and nail puller. This precaution protects you from injury and ensures a smoother construction process.
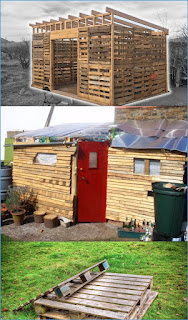
Constructing the Shed Frame: Assembling the Walls and Roof
With your prepared pallets, you’re ready to begin the construction. You can either build a simple, open-fronted structure or create a more enclosed shed with a door. For the walls, arrange the pallets vertically, securing them together using strong screws and possibly additional support beams. For the roof, you may want to consider building a simple gable roof using more pallets or using affordable roofing materials like corrugated metal or plastic sheeting. Make sure your base is level to prevent structural issues later. A simple base of concrete blocks or even a compacted dirt floor will suffice.
Adding a Door and Finishing Touches
A simple door can be built using additional pallets or salvaged lumber. Consider adding hinges, a latch, and perhaps a small window for ventilation and light. Once the structure is complete, you can add a coat of weather-resistant sealant to protect the wood and extend the life of your shed. Personalize your shed further with paint, a decorative sign, or other garden accents.
Safety First: Important Considerations
Building a free pallet shed is a rewarding project that transforms discarded materials into a useful and attractive addition to your garden. With careful planning and execution, you'll create a durable and personalized storage solution for your gardening tools, saving money and adding a touch of rustic charm to your outdoor space.
0 comments:
Post a Comment
Note: Only a member of this blog may post a comment.